Around the globe, more than 300 emails are sent and received each day, on average. That's 300 opportunities to market yourself and your business in those individual emails you send.
A lot of people treat their email signatures like an afterthought, which is a big missed opportunity. Those signatures are a chance for you to make it clear who you are, make it easy for people to reach you, and give people a place to go to find out more — either about you, about your business, or about something you're working on.

So, if you're just putting your name and a point or two of contact information in your signature, you're not taking full advantage of the opportunity to connect and engage with the people you're emailing. So what exactly should go in your signature?
1. First and Last Name
Just like with snail mail correspondence, your name should always be included so that the recipient of your message knows who it was from. This manifests in the email signature, often as the first line of text.
2. Affiliation Info (Such as Job Title and Department)
Closely following your name should be your affiliation information. Your affiliations could include your job title, your company or organization, and/or even your department. Your name should eventually be its own draw, of course, as you build a relationship with the recipient, but providing this information provides more context about the conversation and your role in it.
In addition, affiliating yourself with a larger organization lends you more credibility, especially if it's a recognizable organization. This helps you get the attention of your readers so they take your message seriously.
3. Secondary Contact Information
Secondary contact information is important, too, so that the recipient knows how else to contact you. Secondary information might include phone, fax, or any other method of communication you want to emphasize. In situations where you don't want to cough up your direct line, you could take this opportunity to promote your personal website — a passive way to open the lines of communication without flooding yourself with outreach if you don't want it.
4. Social Profile Icons
Your social media presence is a major part of your personal brand because it helps you gain a following in your space and shows people what you care about. You can tell a lot about a person by what they post and how they portray themselves.
That's why it's a great idea to include links to your social media pages in your email signature. It not only reinforces your personal brand, but it also helps people find new ways to contact and follow you.
Even better? It can help drive traffic to your online content if you're posting links to that content on social media. So if you do include social icons in your signature, make sure you're keeping your social profiles up-to-date and chock full of interesting, relevant content. (In other words, if you haven't tweeted in six months, you may want to leave Twitter out.)
Why use social media icons instead of simply text links? Because icons are more easily recognizable for folks skimming your signature — and they'll stand out from the rest of the text in there. According to research from NeoMam Studios, visuals shown in color increase a person's willingness to read the rest of the content by 80%. That's a huge advantage. Plus, icons are big space-savers in a place where you might be packing a lot of information.
Even if you have a presence on a lot of social media sites, though, try to cap the number of icons to five or six. Focus on the accounts that matter most to growing your business or building your personal brand.
If you do include a lot of social media icons, at least try to cut back on the other content if possible so your design isn't too busy. Check out the example below, made using HubSpot's Email Signature Generator.

5. Call to Action
One of the smartest things you can do in your email signature is include a call-to-action. The best email signature CTAs are simple, up-to-date, non-pushy, and in line with your email style, making them appear more like post-script, and less like a sales pitch. Choose a CTA that aligns with one of your current business goals, and update it when those goals change. Here's an example of a HubSpotter's email signature that includes a CTA for the HubSpot Podcast Network:-png.png?width=400&name=Untitled%20design%20(1)-png.png)
6. Booking Links
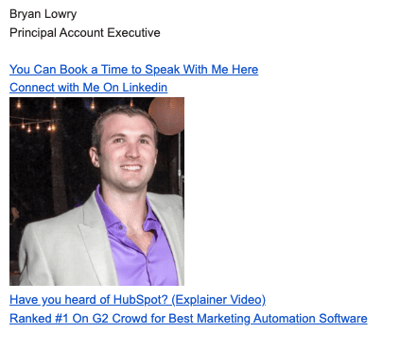
If you find yourself emailing back and forth with colleagues and clients who want to book meetings with you, make it easy for them by including a link to book your calendar right in your email signature. Here's an example from our own Bryan Lowry, below.
There are many tools out there that'll help people book appointments. Bryan from the example above uses HubSpot's shareable personalized booking link. If you're a HubSpot Sales customer, you can share your personalized meeting link with anyone who you want to book a meeting with and let them choose from your available times. If you want, you can make it so the HubSpot CRM automatically creates a new contact record for anyone who books a meeting if one doesn't already exist.
If you aren't a HubSpot customer, one great meeting tool is Calendly, which is free for Basic and lets you integrate your Google or Office 365 calendar. If you're looking for a Calendly alternative, YouCanBook.me is another booking tool that goes for $7 per calendar per month.
7. Industry Disclaimer or Legal Requirements
Some industries such as legal, financial, and insurance have specific guidelines on email usage and etiquette to protect private information from being transmitted. For this reason, you may want to look into what regulations your industry has in place and include a disclaimer in your signature about email transmissions. Mail-Signatures offers a number of email disclaimer examples, including this one:
"The content of this email is confidential and intended for the recipient specified in the message only. It is strictly forbidden to share any part of this message with any third party, without a written consent of the sender. If you received this message by mistake, please reply to this message and follow with its deletion, so that we can ensure such a mistake does not occur in the future."
8. Photo or Logo
An image is a great choice to spice up your email signature. If you want a personal touch so that recipients you've never met can associate your name with your face, consider using a professional photo in your signature. Alternatively, you can use the company's logo to add more brand awareness to the email.
9. Pronouns
While not as common in email signatures and certainly not required, adding your preferred pronouns to your signature is helpful, especially when emailing individuals you've never met. It also takes ambiguity away if you have a name perceived as gender-neutral.
Now that you know the elements you should include, what does a great email signature look like? Here are some tips for creating signatures that are helpful and professional, including a few great examples.
1. Emphasize your name, affiliation, and secondary contact information.
As you might guess, your name comes first. Closely following your name, however, should be your affiliation and where else people can reach you.
Your affiliation could mean your job title, your company, your school, or a similar organization that you deem important to your recipients. Your name should eventually be its own draw, of course, but using a more popular brand name — and even its logo — ensures you get the attention of your readers and they take your message seriously.
Secondary contact information is important, too. You might not want to endorse your personal phone number, but you could take this opportunity to promote your personal website — a passive way to open the lines of communication without flooding yourself with outreach you don't want.
Here's a sample email signature that hits on all three things described above nicely. Kevin's first and last name are accompanied by his affiliation with the University of Connecticut. He also promotes his personal website so his recipients have another outlet to see his work and contact him for more information.
Want to create a signature like the one below? Use HubSpot's Email Signature Generator.

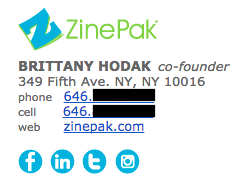
2. Keep the colors simple and consistent.
Branding is most effective when it’s consistent — and that includes your email signature. Adding color to your email signature is a nice touch that'll help it stand out from the rest of your email. But if you do choose to use color, be sure to stick to one or two in addition to dark text.
Use subtle highlights to match your logo or branding, like Brittany Hodak does in her email signature, below. Notice how her social media icons are the same blue hue as the ZinePak logo.
3. Use design hierarchy.
Good design is all about presenting your information in an easily digestible manner. Because your email signature is likely more a list of information than it is a compelling story, you'll want to use hierarchy to direct readers' eyes to what they should be reading first.
Scale your name up to a larger font so that it attracts the most attention, like you would on a resume. Then, pick and choose information to bold and color based on importance so you can help guide people's eyes logically through the design.
4. Make links trackable.
So you put a few links in your email signature, including your CTA and your social media icons. But is anyone actually clicking on them?
To figure out whether the links in your signature are actually attracting clicks and making an impact, you'll want to make those links trackable — just like you would any other link in your emails.
Follow these instructions to easily make a tracking link that helps you attribute traffic to your website to your email signature. From time to time, you might switch up the format of your signature or the wording inside your signature to see what drives the most clicks.
5. Use space dividers.
Although you never want to jam-pack your email signature for too much information, there are ways to fit a lot of text into a compact area like this one without compromising design.
This is helpful for breaking up different types of information, like your name and contact information, your logo, any calls-to-action you have, or even a disclaimer.
Using space dividers within your design, as in the example below, is one great way to do this. You can also use glyph dividers, which is the vertical bar symbol (i.e., |.)

6. Include an international prefix in your contact number.
If you work with people around the world, don’t forget the prefix for your country’s code when you list your contact phone number. Many people overlook this if they aren't used to dialing international prefixes themselves, but it's really helpful for your international colleagues and clients to have it right there. Here's a list of country codes if you don't know yours.
Here's an example from Kit Smith, formerly of Brandwatch, a company that has offices in both the United States and Europe and works with international clients. Including the U.S. country code makes it easier for folks in other countries to reach him by phone.

7. Make your design mobile-friendly.
According to Truelist, over a third of professionals open emails on their phone making it a prime method of communication for business and professional matters.
The more people who read email on mobile devices, the more you'll want to keep mobile users top-of-mind when you're writing emails — including your email signature.
One major way to make your email signature mobile-friendly is to make your signature's design easy to read and clickable for mobile users. This is where scale becomes really important. Make sure your text is large enough to read on small mobile screens, and that your links and buttons are large enough — and spaced out enough — for folks to tap on with their fingers.
Check out the example below, and note how much space there is between different clickable elements like the social media icons. These are great for tapping with your finger on a mobile screen so that users don't accidentally tap on the Facebook icon when they meant to go to Twitter.

8. Use an email signature generator.
If you've tried all of these steps and you're still not happy with how your email signature turned out, don't fret. These digital sign-offs can be tricky to get perfect. Try a free email signature generator to do the heavy lifting for you instead.
Rather than choosing the colors, fonts, and layout yourself, this generator gives you several combinations to choose from. Simply add your information, photos, and links. Then choose your colors. Once you're satisfied with your email signature, you can add it to your email account right away.
9. Check your new email signature for quality.
Finally, as with any part of an email, make sure your signature looks as good as you think it does by testing it with various email clients. Microsoft Outlook doesn't recognize background images, for example, so avoid using those. Other email clients don't load images by default at all.
Best Professional Email Signature
The best professional email signature will be true to who you are both in and outside the workplace. Once you include the basic contact information, the rest of your email signature is a blank canvas for you to share a bit of personality with each professional email you send.
Armed with these email signature best practices, you can create your own signature that aligns with your brand and gives your emails a little extra umph.
Editor's note: This post was originally published in June 2019 and has been updated for comprehensiveness.

from Marketing https://blog.hubspot.com/marketing/professional-email-signatures
Around the globe, more than 300 emails are sent and received each day, on average. That's 300 opportunities to market yourself and your business in those individual emails you send.
A lot of people treat their email signatures like an afterthought, which is a big missed opportunity. Those signatures are a chance for you to make it clear who you are, make it easy for people to reach you, and give people a place to go to find out more — either about you, about your business, or about something you're working on.
So, if you're just putting your name and a point or two of contact information in your signature, you're not taking full advantage of the opportunity to connect and engage with the people you're emailing. So what exactly should go in your signature?
1. First and Last Name
Just like with snail mail correspondence, your name should always be included so that the recipient of your message knows who it was from. This manifests in the email signature, often as the first line of text.
2. Affiliation Info (Such as Job Title and Department)
Closely following your name should be your affiliation information. Your affiliations could include your job title, your company or organization, and/or even your department. Your name should eventually be its own draw, of course, as you build a relationship with the recipient, but providing this information provides more context about the conversation and your role in it.
In addition, affiliating yourself with a larger organization lends you more credibility, especially if it's a recognizable organization. This helps you get the attention of your readers so they take your message seriously.
3. Secondary Contact Information
Secondary contact information is important, too, so that the recipient knows how else to contact you. Secondary information might include phone, fax, or any other method of communication you want to emphasize. In situations where you don't want to cough up your direct line, you could take this opportunity to promote your personal website — a passive way to open the lines of communication without flooding yourself with outreach if you don't want it.
4. Social Profile Icons
Your social media presence is a major part of your personal brand because it helps you gain a following in your space and shows people what you care about. You can tell a lot about a person by what they post and how they portray themselves.
That's why it's a great idea to include links to your social media pages in your email signature. It not only reinforces your personal brand, but it also helps people find new ways to contact and follow you.
Even better? It can help drive traffic to your online content if you're posting links to that content on social media. So if you do include social icons in your signature, make sure you're keeping your social profiles up-to-date and chock full of interesting, relevant content. (In other words, if you haven't tweeted in six months, you may want to leave Twitter out.)
Why use social media icons instead of simply text links? Because icons are more easily recognizable for folks skimming your signature — and they'll stand out from the rest of the text in there. According to research from NeoMam Studios, visuals shown in color increase a person's willingness to read the rest of the content by 80%. That's a huge advantage. Plus, icons are big space-savers in a place where you might be packing a lot of information.
Even if you have a presence on a lot of social media sites, though, try to cap the number of icons to five or six. Focus on the accounts that matter most to growing your business or building your personal brand.
If you do include a lot of social media icons, at least try to cut back on the other content if possible so your design isn't too busy. Check out the example below, made using HubSpot's Email Signature Generator.
5. Call to Action
One of the smartest things you can do in your email signature is include a call-to-action. The best email signature CTAs are simple, up-to-date, non-pushy, and in line with your email style, making them appear more like post-script, and less like a sales pitch. Choose a CTA that aligns with one of your current business goals, and update it when those goals change. Here's an example of a HubSpotter's email signature that includes a CTA for the HubSpot Podcast Network:
6. Booking Links
If you find yourself emailing back and forth with colleagues and clients who want to book meetings with you, make it easy for them by including a link to book your calendar right in your email signature. Here's an example from our own Bryan Lowry, below.
There are many tools out there that'll help people book appointments. Bryan from the example above uses HubSpot's shareable personalized booking link. If you're a HubSpot Sales customer, you can share your personalized meeting link with anyone who you want to book a meeting with and let them choose from your available times. If you want, you can make it so the HubSpot CRM automatically creates a new contact record for anyone who books a meeting if one doesn't already exist.
If you aren't a HubSpot customer, one great meeting tool is Calendly, which is free for Basic and lets you integrate your Google or Office 365 calendar. If you're looking for a Calendly alternative, YouCanBook.me is another booking tool that goes for $7 per calendar per month.
7. Industry Disclaimer or Legal Requirements
Some industries such as legal, financial, and insurance have specific guidelines on email usage and etiquette to protect private information from being transmitted. For this reason, you may want to look into what regulations your industry has in place and include a disclaimer in your signature about email transmissions. Mail-Signatures offers a number of email disclaimer examples, including this one:
"The content of this email is confidential and intended for the recipient specified in the message only. It is strictly forbidden to share any part of this message with any third party, without a written consent of the sender. If you received this message by mistake, please reply to this message and follow with its deletion, so that we can ensure such a mistake does not occur in the future."
8. Photo or Logo
An image is a great choice to spice up your email signature. If you want a personal touch so that recipients you've never met can associate your name with your face, consider using a professional photo in your signature. Alternatively, you can use the company's logo to add more brand awareness to the email.
9. Pronouns
While not as common in email signatures and certainly not required, adding your preferred pronouns to your signature is helpful, especially when emailing individuals you've never met. It also takes ambiguity away if you have a name perceived as gender-neutral.
Now that you know the elements you should include, what does a great email signature look like? Here are some tips for creating signatures that are helpful and professional, including a few great examples.
1. Emphasize your name, affiliation, and secondary contact information.
As you might guess, your name comes first. Closely following your name, however, should be your affiliation and where else people can reach you.
Your affiliation could mean your job title, your company, your school, or a similar organization that you deem important to your recipients. Your name should eventually be its own draw, of course, but using a more popular brand name — and even its logo — ensures you get the attention of your readers and they take your message seriously.
Secondary contact information is important, too. You might not want to endorse your personal phone number, but you could take this opportunity to promote your personal website — a passive way to open the lines of communication without flooding yourself with outreach you don't want.
Here's a sample email signature that hits on all three things described above nicely. Kevin's first and last name are accompanied by his affiliation with the University of Connecticut. He also promotes his personal website so his recipients have another outlet to see his work and contact him for more information.
Want to create a signature like the one below? Use HubSpot's Email Signature Generator.
2. Keep the colors simple and consistent.
Branding is most effective when it’s consistent — and that includes your email signature. Adding color to your email signature is a nice touch that'll help it stand out from the rest of your email. But if you do choose to use color, be sure to stick to one or two in addition to dark text.
Use subtle highlights to match your logo or branding, like Brittany Hodak does in her email signature, below. Notice how her social media icons are the same blue hue as the ZinePak logo.
3. Use design hierarchy.
Good design is all about presenting your information in an easily digestible manner. Because your email signature is likely more a list of information than it is a compelling story, you'll want to use hierarchy to direct readers' eyes to what they should be reading first.
Scale your name up to a larger font so that it attracts the most attention, like you would on a resume. Then, pick and choose information to bold and color based on importance so you can help guide people's eyes logically through the design.
4. Make links trackable.
So you put a few links in your email signature, including your CTA and your social media icons. But is anyone actually clicking on them?
To figure out whether the links in your signature are actually attracting clicks and making an impact, you'll want to make those links trackable — just like you would any other link in your emails.
Follow these instructions to easily make a tracking link that helps you attribute traffic to your website to your email signature. From time to time, you might switch up the format of your signature or the wording inside your signature to see what drives the most clicks.
5. Use space dividers.
Although you never want to jam-pack your email signature for too much information, there are ways to fit a lot of text into a compact area like this one without compromising design.
This is helpful for breaking up different types of information, like your name and contact information, your logo, any calls-to-action you have, or even a disclaimer.
Using space dividers within your design, as in the example below, is one great way to do this. You can also use glyph dividers, which is the vertical bar symbol (i.e., |.)
6. Include an international prefix in your contact number.
If you work with people around the world, don’t forget the prefix for your country’s code when you list your contact phone number. Many people overlook this if they aren't used to dialing international prefixes themselves, but it's really helpful for your international colleagues and clients to have it right there. Here's a list of country codes if you don't know yours.
Here's an example from Kit Smith, formerly of Brandwatch, a company that has offices in both the United States and Europe and works with international clients. Including the U.S. country code makes it easier for folks in other countries to reach him by phone.
7. Make your design mobile-friendly.
According to Truelist, over a third of professionals open emails on their phone making it a prime method of communication for business and professional matters.
The more people who read email on mobile devices, the more you'll want to keep mobile users top-of-mind when you're writing emails — including your email signature.
One major way to make your email signature mobile-friendly is to make your signature's design easy to read and clickable for mobile users. This is where scale becomes really important. Make sure your text is large enough to read on small mobile screens, and that your links and buttons are large enough — and spaced out enough — for folks to tap on with their fingers.
Check out the example below, and note how much space there is between different clickable elements like the social media icons. These are great for tapping with your finger on a mobile screen so that users don't accidentally tap on the Facebook icon when they meant to go to Twitter.
8. Use an email signature generator.
If you've tried all of these steps and you're still not happy with how your email signature turned out, don't fret. These digital sign-offs can be tricky to get perfect. Try a free email signature generator to do the heavy lifting for you instead.
Rather than choosing the colors, fonts, and layout yourself, this generator gives you several combinations to choose from. Simply add your information, photos, and links. Then choose your colors. Once you're satisfied with your email signature, you can add it to your email account right away.
9. Check your new email signature for quality.
Finally, as with any part of an email, make sure your signature looks as good as you think it does by testing it with various email clients. Microsoft Outlook doesn't recognize background images, for example, so avoid using those. Other email clients don't load images by default at all.
Best Professional Email Signature
The best professional email signature will be true to who you are both in and outside the workplace. Once you include the basic contact information, the rest of your email signature is a blank canvas for you to share a bit of personality with each professional email you send.
Armed with these email signature best practices, you can create your own signature that aligns with your brand and gives your emails a little extra umph.
Editor's note: This post was originally published in June 2019 and has been updated for comprehensiveness.

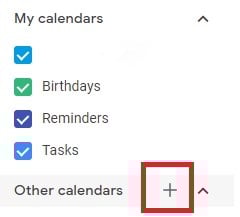
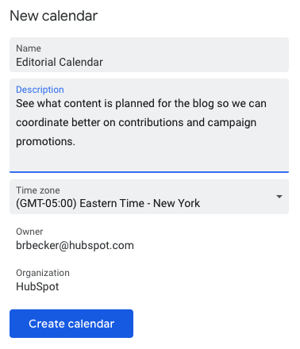
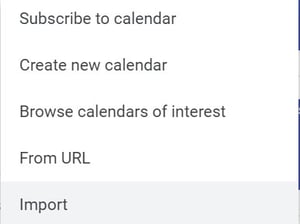
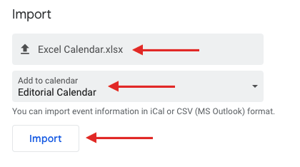
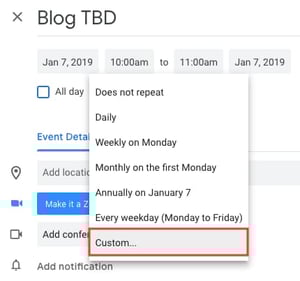
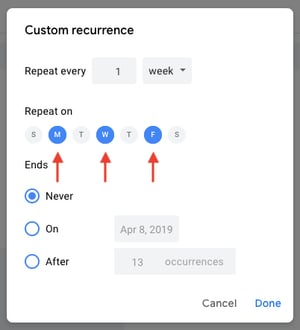

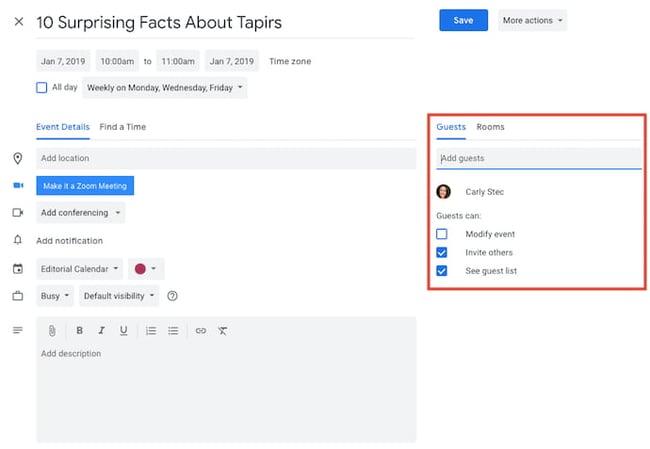
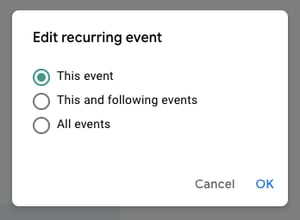
 Google Calendar also makes things really easy to move around and schedule because, well, it's already a calendar. It has all the functionality you need to schedule stuff out and let the people who need to know about it know.