Some things you think will be simple actually end up getting really complex. Google knows this all too well, which is why Google Calendar has plenty of nifty features to simplify scheduling.
Your Google Calendar comes with your personal Gmail address, and you won't believe how simple it is to use and set up. However, when working at a company with a corporate Google account you suddenly have to find out how best to integrate your personal calendar with your weekly meeting schedule.
Below are some of our favorite tips, tricks, and features available in Google Calendar.
Skip to:
21 Google Calendar Features That'll Make You More Productive
1. Create new calendars for different parts of your life.
When you first start out on Google Calendar, you're given one calendar to start with — it's the one with your name under "My calendars," as shown in the screenshot below.
So, if you want to use your calendar for multiple purposes — like managing your actual schedule, planning periods of focused work time, and scheduling repeating reminders — you only have one place to do it. But when you're only working with one calendar, all of those things get treated equally — meaning you can't quickly and easily pull up the non-repetitive, important tasks you have for the day.
To combat this, just create a new calendar for each part of your life you'd like to keep track of on your Google Calendar.
How to Use This Feature
To create a new calendar, click the little plus sign (+) next to "My calendars," and you'll see the option, "New calendar." Select this option, name your new calendar, give it a description and time zone, and voilà — you've got yourself another calendar.
Pro Tip: You can even color-code each calendar to make it easy for you to pick out what you've got to do each day.
2. Schedule meetings with groups using "Find a time" or "Suggested times."
Do you ever need to arrange a meeting with several people who have busy schedules? It can be really annoying to try to figure out when you're all free. Thankfully, Google Calendar actually has two features that can do the heavy lifting for you: "Suggested times" or "Find a time."
How to Use This Feature
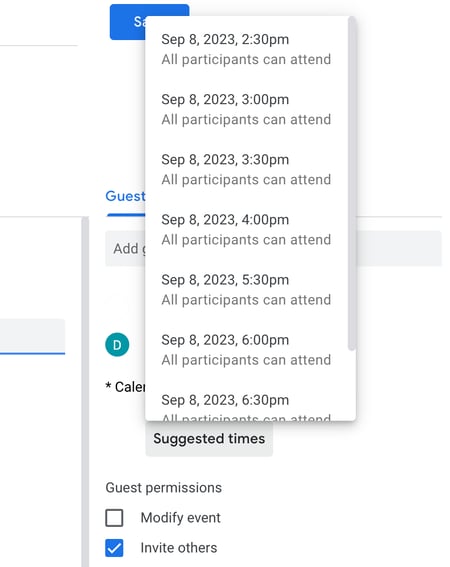
To use either of these two options, first make sure you've added everyone to the event who needs to attend. Then, if you'd like Google to suggest a time for you to meet, simply select the "Suggested times" link below your guests' names. A dropdown window will appear with a list of times when every meeting guest, including you, is available with no conflicts.
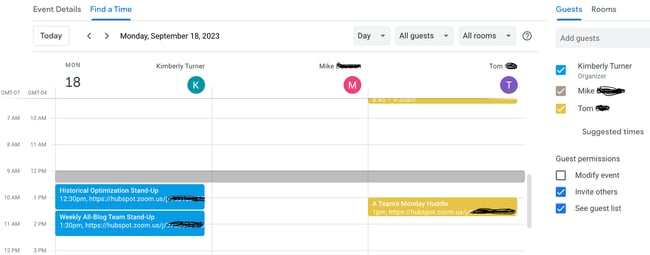
"Find a time" is the other way to quickly find a time that works for every guest included on the meeting invitation. To use this feature, choose the tab next to "Event details" called "Find a time," and you'll see everyone's schedules side-by-side for the day of your intended meeting. When you see a time when none of your guests have conflicts, click this line of the calendar to highlight the time and press "Save" at the top of your Calendar.
Pro tip: you can also use a free product like HubSpot Meetings to easily schedule meetings without back-and-forth emails. With HubSpot's Meetings tool, you can send a generic link and ask customers or prospects to choose a time on your calendar that works for them, or choose the sales rep who has the soonest availability.
3. Sync meetings with your CRM.
Use a CRM daily? It can be annoying to back and forth between your Google Calendar and your CRM. Instead, dive into your CRM settings to see if there's an existing integration with Google Calendar.
HubSpot CRM users, you're in luck — it's quick and easy to set up this integration. Learn how to do this here.
4. Sync your calendar with your marketing software.
If you want to make your Google Calendar align even more with your marketing activities, you can integrate it with your marketing software.
For HubSpot customers, you can use Zapier to set up some pretty nifty workflows, such as creating a social media message every time an event starts. Check out this page for more on how you can set up that integration, as well as some ideas for ways you can integrate the two.
5. Hide your event details.
Sometimes, the meetings you host or attend are sensitive in nature. Keep in mind, however, that a closed door isn't the only way for others to know what's going on inside. The event's details in Google Calendar can also reveal more to the rest of the office than you'd like.
To ensure you have as much privacy as you need during more sensitive meetings, set your event to "Private." This makes it so nobody viewing your weekly schedule sees the details of the event — meeting name, attendees, attachments, and so forth. By default, the public label on the event block will simply be, "Busy."
How to Use This Feature
To privatize the details of certain events on your calendar, click the event from your calendar view and select the pencil icon to edit the event's details. In the window that appears, find the briefcase icon just above the event description field.
With the first field set to "Busy," click into the second field and select "Private" from the dropdown, as shown below. Hit the blue "Save" button at the top of your screen and you'll be all set.

6. Add a Google Meet to your event.
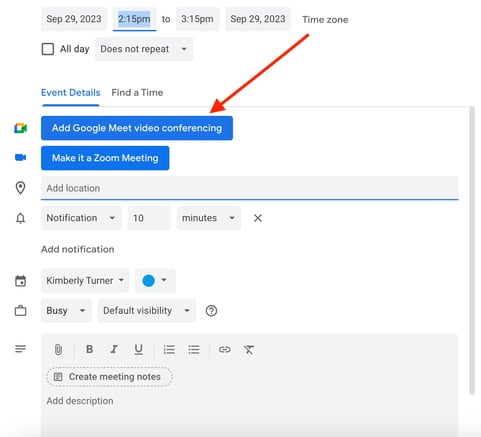
Need to easily set up a face-to-face remote meeting? Just click the link to "Add Google Meet," and Google will set up a video call for your event attendees to use. (Learn more about Google Meet here)
7. Add attachments.
I don't know about you, but I often find myself attending meetings that require me to reference a relevant document. Maybe we're all working off one Google Doc, or perhaps we're pouring over an intricate spreadsheet.
Regardless, it's best to make sure all meeting attendees have the materials they need before the meeting begins so they don't have to go hunting in their inboxes for it. Google Calendar can help you do this, allowing you to attach documents directly to the event for guests to open and review.
How to Use This Feature
To attach a document to your event, click on your event block from the calendar view and select the pencil icon to edit the event, as shown below.
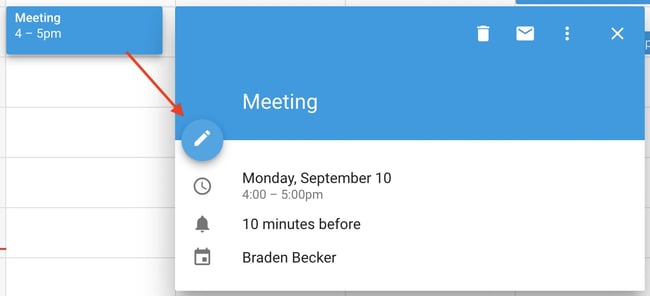
Once you're in the event's edit screen, look for a paper clip icon right above the description section, as shown in the screenshot below. Click this icon and a large window will appear where you can upload files to attach directly from your Google Drive.
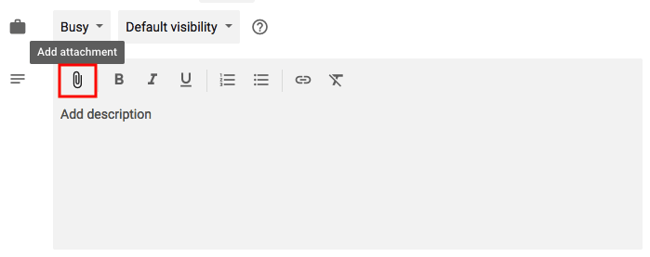
Pro tip: When you reach the upload window, you can toggle to the "My Drive" tab to attach Google Docs, Sheets, and Slides that already exist in your Google Drive. Or, you can click the "Upload" tab on the far left of the window to attach offline files from your computer.
8. Enable your world clock.
Do you work with teammates who live around the world? You might find it's difficult to figure out what time is appropriate to schedule meetings with them. Fortunately, you can — by enabling "World Clock" in your Google Calendar settings.
How to Use This Feature
To quickly check multiple time zones when arranging meetings, click the gear icon on the top-righthand corner of your calendar view. These are your settings. Then, navigate to the "World clock" section, check the first blue box, and select the time zones you want to see from your calendar view.
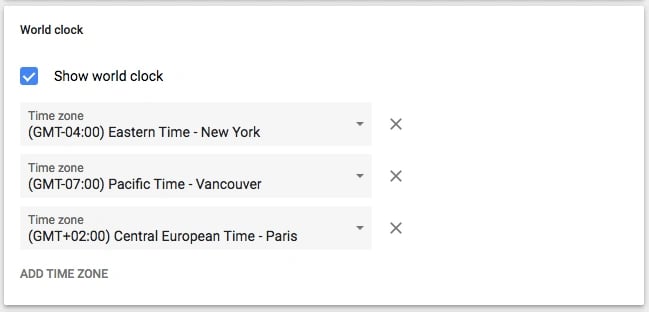
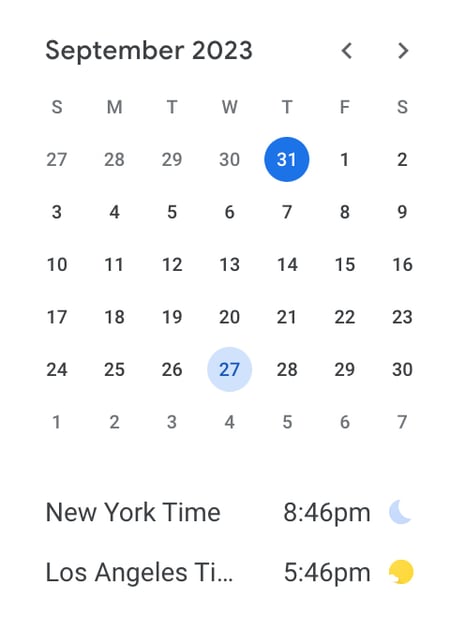
Once you've chosen the time zones you want, return to your calendar view and you'll see the following on your Google Calendar's lefthand sidebar:
9. Enable working hours.
Not everyone is a 9-to-5 worker, but they might work quite a bit with those who are. If you have an unconventional work schedule that none of your colleagues seem to remember, this feature is for you.
"Working Hours" is a setting that alerts people if they try to add you to a meeting that lies outside a range of hours set by you in Google Calendar. Hey, it beats having to hit "Decline" and then follow up with the meeting organizer to remind them you're unavailable during that time.
A Google Calendar tipthat John Hall, Co-founder of Calendar, advises people to use is speedy meetings. "Beneath the default meetings duration settings is the option to create Speedy Meetings. Check the box and 30-minute meetings will automatically be scheduled to last 25 minutes while longer meetings will be cut by ten minutes. That way your working hours become more productive since you end meetings sooner and have time to catch up on todos that don't keep you beyond working hours."
How to Use This Feature
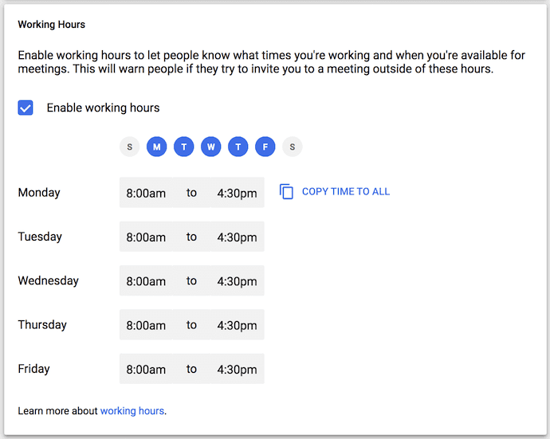
To enable specific working hours on your Google Calendar, click the gear icon from your calendar view to access your settings. Navigate to the "Working Hours" section, as shown below. Here, you'll be able to specify when you're in and out of work each day of the week.
10. Email event guests.
Remember the time you tried to email a large group of people about an event? Maybe you were trying to coordinate a team outing — or just let everyone know they should bring their laptops to the all-hands meeting. Regardless, I'll bet it was annoying to figure out who was actually going to the event and ensure you didn't forget anyone.
Well, this Google Calendar feature will come in handy next time.
How to Use This Feature
As long as you've added everyone to the event that needs to go, you can easily email everyone in the group by clicking on the event block from your calendar view and clicking the envelope icon.
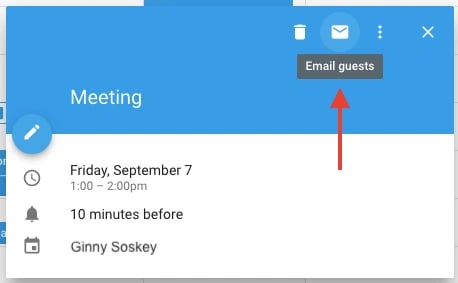
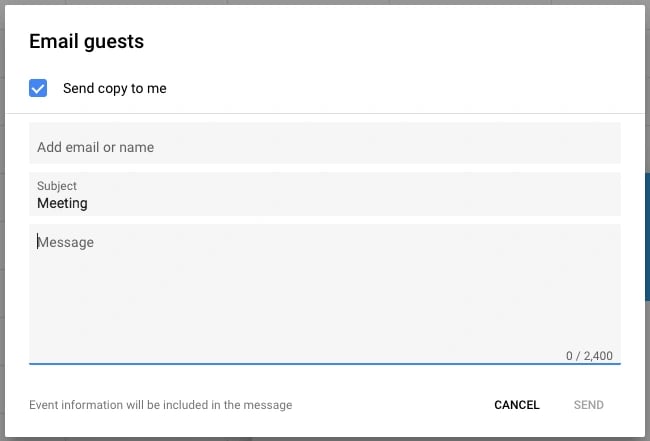
Once you click on the envelope icon inside the event block, an email compose box will appear. Simply type in your message, type in the email addresses of the people you want to receive it, and hit send.
11. Add specific meeting locations.
I wish I'd known about this feature the last time I got coffee with someone in downtown Boston. We agreed to meet at Starbucks ... but thanks to the multitude of Starbucks locations in Boston, our conversation went something like this:
"Okay, so let's meet at the one on State Street," I said.
"Oh, the one by the Court House?" he asked.
"Well, it's kinda by the Court House, but further down State Street," I replied.
"Oh, you mean the one by Downtown Crossing?" he clarified.
How to Use This Feature
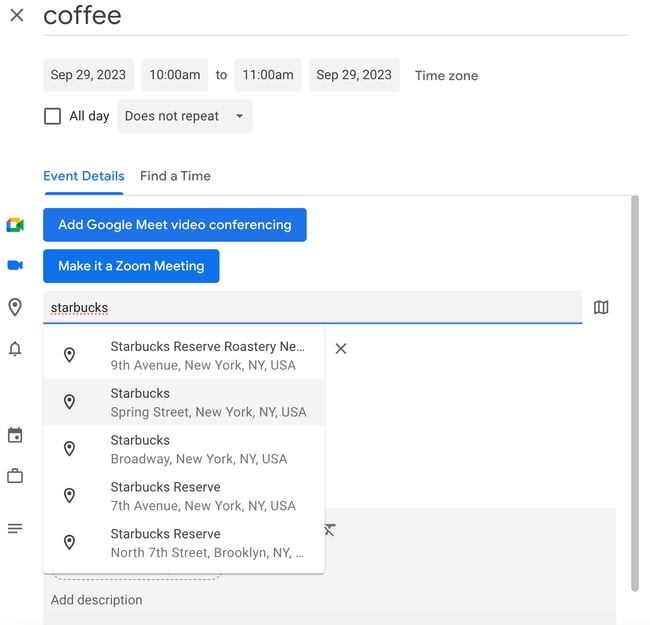
The logistics of a meeting can get fuzzy without a specific address or conference room. Thankfully, Google Calendar has a feature that'll fix all that. Instead of having the back-and-forth, I could've just sent my friend a calendar invitation with the specific address in the "Where" box. It integrates with Google Maps so it's super easy to figure out where you're meeting and how to get there.
12. Use desktop notifications.
As you probably can tell by now, I love Google Calendar ... but there is one feature of which I am not a fan.
If you have your Google Calendar open as a tab in your browser when it's 10 minutes before your next event, the 10-minute warning interrupts everything you're doing and takes over your screen. Forget about what you were working on -- Google Calendar will suddenly surface its tab with a big pop-up alert coupled with an annoying sound. It's the worst.
Luckily, there's a setting in Google Calendar that you can use to make notifications much less annoying: "Desktop notifications." Rather than interrupting your work, you'll see a much gentler box slide in from the top-righthand corner of your computer screen, displaying the name of the event that's 10 minutes away.
How to Use This Feature
To enable "Desktop notifications" in Google Calendar, click into your settings using the gear icon on the top-righthand corner in your calendar view. Scroll down to "Event settings" and click the "Notifications" box, as shown below.
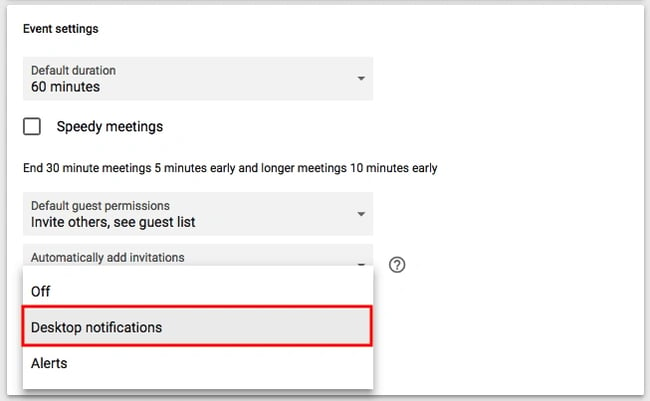
By default, your notifications might be set as "Alerts," causing each event's 10-minute warning to hijack your computer screen. Instead, select "Desktop notifications," return to your calendar view, and you will have successfully enabled gentler meeting notifications.
13. Change the event notification time.
In the previous tip, you learned how to soften the notifications you receive in advance of a meeting. But did you also know you can change the number of minutes before the event you want to be notified?
How to Use This Feature
By default, Google will notify you 10 minutes before the event's start time. To change this warning time for a particular event, click on the event from your calendar view, and select the pencil icon to edit the event's settings.
In the event details, find the bell icon just below the video conferencing line. Hover your cursor over the box listed "10" and toggle up and down using the small arrow keys that appear to the right to change the number of minutes in advance you want to be notified. As you can see below, you can tell Google to notify you hours, days, or weeks in advance, too.
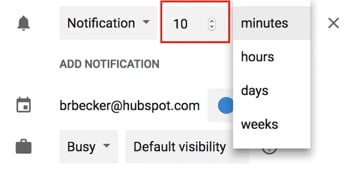
Pro tip: To the left of the "10," you can change "Notification" to "Email" if you'd rather be told about upcoming meetings via email instead of a desktop notification.
14. Arrange appointment schedules.
Ever thought about incorporating "office hours" so other folks in your company can book time with you? Maybe you're a part-time consultant with limited hours to book meetings, or want to limit the times your team can book time with you to certain times of day.
If any of the above scenarios resonate with you, think about using Google's Appointment schedules.
Google's Appointment schedules allow you carve out specific times of day on your calendar and then share these times with select people via a private calendar link. When these people click the link, they can schedule meetings with you at any of the times you carved out for them.
If your link recipients find a time they like, all they have to do is select it to book a private event with you, including all the information they'd need for the meeting.
How to Use This Feature
To set up your own Appointment slots, start by clicking anywhere in your calendar view to create an event. When the event options appear, click "Appointment schedules," as shown below at the very top of the window. Set the date range of the slots you'd like to open up for appointments, as well as how long each appointment should be by default next to "Slots with duration."
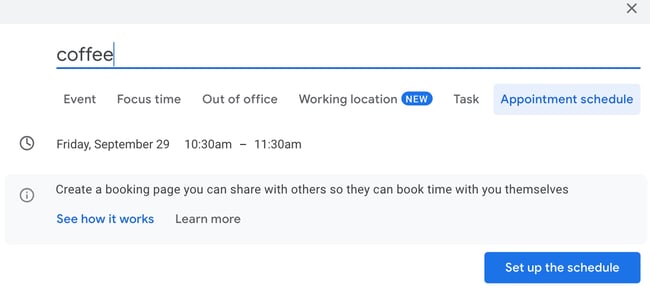
If you'd like more control over your Appointments, click "More Options," and you'll be taken to the window shown below. Click "This calendar's appointment page" for the link you can then share with those whom you're willing to arrange appointments.
15. Browse calendars of interest.
Want to make sure you're keeping track of holidays in other countries, your favorite sports team's schedule, or just the time the sun rises and sets each day? You'll find these calendars (and more) on your Google Calendar's lefthand sidebar.
How to Use This Feature
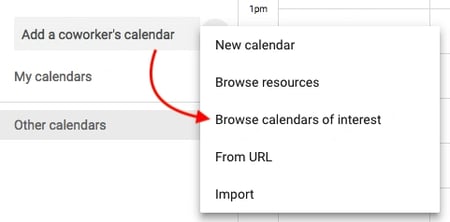
To browse and add interesting calendars, click the plus sign (+) next to "Add a coworker's calendar." Then, choose "Browse calendars of interest." From there, choose the calendars you'd like to subscribe to.
.webp?width=450&height=223&name=calendartips_26%20(1).webp)
16. Implement a custom view.
When you first set up your calendar, you'll have the option to view it as a week, month, the next 4 days, or as an agenda. That "4 days" option? You can switch that out with a different interval in your "Custom view" options.
How to Use This Feature
To adjust the number of days you see in your calendar view, click into your settings using the gear icon on the top-righthand corner of your screen. Scroll down to "View options." Click "Set custom view" and select how many days you want to see at one time from your calendar view, as shown below.
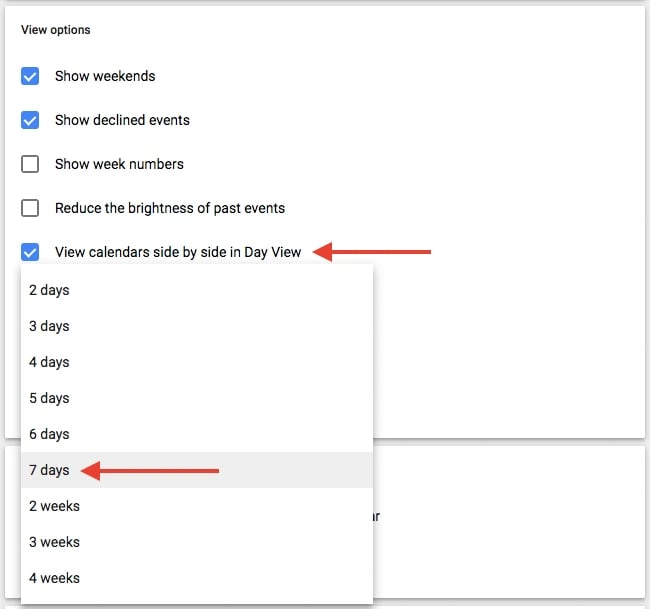
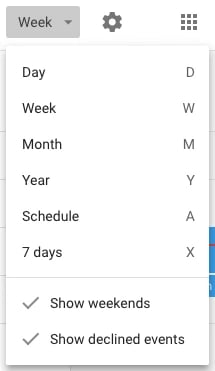
You can also make quicker, more general adjustments to your user interface right from your calendar view. Next to your settings' gear icon, you'll see a box that, by default, might say "Week." Click it to reveal a dropdown menu where you can customize your view further, as shown below.
17. Share your calendars with others.
If you're using Google Apps for your company, you can also control who sees your calendar, what they see, and whether they have permissions to edit it. (If you have an assistant, this tip will be very important to remember.) You can also make your calendar public, if you wish.
How to Use This Feature
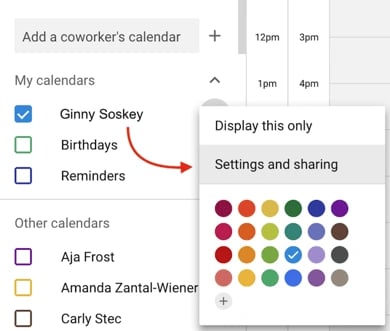
To change your sharing settings, click on the plus sign (+) next to the preferred calendar and choose "Settings and sharing," as shown below.
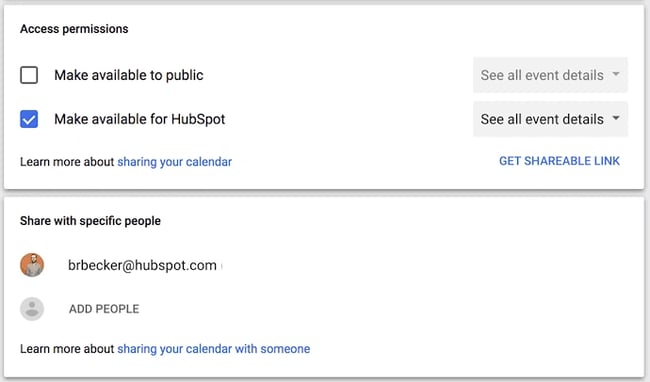
Then, you'll be taken to the page shown below. Here, you can choose to do any of the following:
- Make the calendar public.
- Choose to show event details to everyone in your company, or just free/busy information.
- Add someone to your calendar and choose their individual permissions (see all details, make changes to events, hide all details, etc).
When you're done, click the back arrow on the top-lefthand corner of your screen to return to your calendar view. Google will automatically save your new calendar settings.
18. Use keyboard shortcuts.
Are you looking to really streamline your Google Calendar efforts? Google Calendar's got a ton of keyboard shortcuts to use, such as:
- t = Move your calendar view to today
- c = Create an event
- q = Quick Add an event
19. Use quick shortcuts to find a time or jump back to your current time.
Rather than manually scrolling through each month to find a time far in the future, you can type the letter "G" when you're on your Google Calendar to quickly find a date in the future.
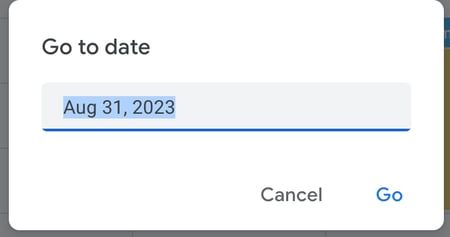
Alternatively, if you've scrolled toofar and want to find your way back to the current time with manually scrolling, type the letter "T" to return to the current date/time.
20. Email all invited guests.
I'll admit — I've been guilty of creating events and then missing a recipient or two when I've attempted to email the entire group a friendly reminder, or necessary information to peruse prior to the meeting.
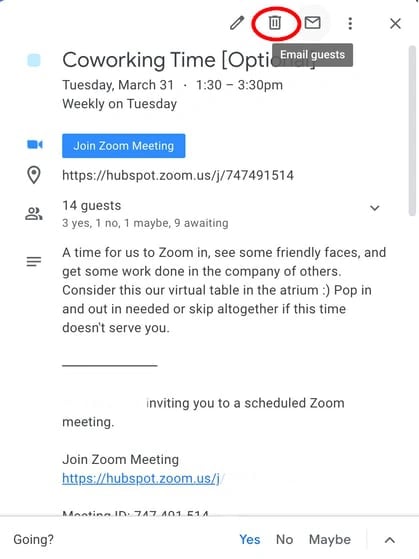
Fortunately, with Google Calendar you don't have to manually type-in every name on the invite. Instead, go to the top of your event and click the Email icon, which enables you to email all your guests from within the calendar itself:
21. Set a "Default Duration" to make shorter meetings, or a "Default Time" to eliminate weekends from your Calendar overview.
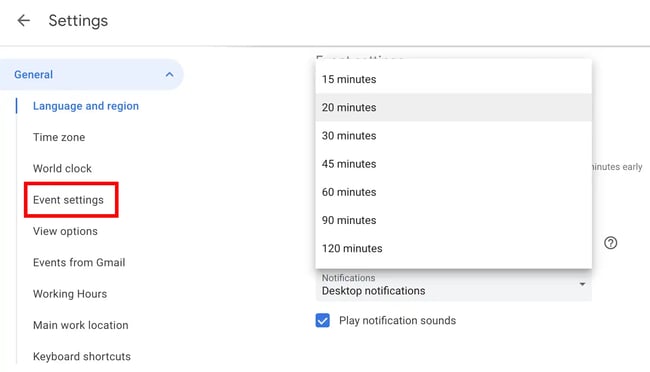
If you're feeling overwhelmed by the 30-minute or hour-long meetings that consistently deprive you of your ability to get other work accomplished, consider setting a "Default Duration" of 15 or 20-minutes for meetings so that, when you're planning quick check-ins on auto-pilot, you'll ensure you've planned your time efficiently.
Of course, for certain meeting topics, 30-minutes to an hour is necessary. But if the majority of your meetings are "catch ups" or brief 1:1's with colleagues, consider whether you can communicate the major points in 20 minutes or less, and save the more minor details for a follow-up email.
Alternatively, if you're like me, you only use your Google Calendar for the workweek — why, then, do you need the added space of Saturday and Sunday?
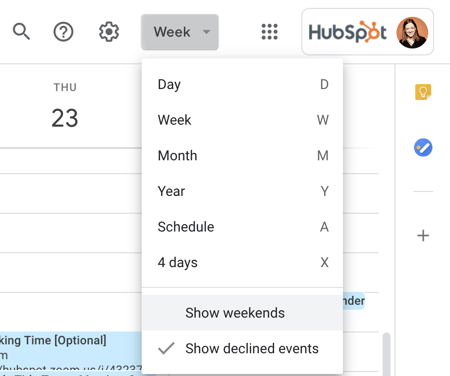
A while ago, I clicked the "Week" toggle at the top of my calendar and de-selected "Show weekends" to ensure I felt I could visualize exactly how my workweek was going to look — and saved my weekends for relaxation and more casual plans I could save in my phone if necessary.
Streamline Your Schedule
Google Calendar can start to feel a lot less simple the more events you have on your agenda. Luckily, these hacks and under-the-radar features make your life in Google Calendar much easier to organize.
Ideally, you'll use one (or a few) of these features to ensure you're using Google Calendar to youruniquebenefit and to fit your own lifestyle and work preferences, rather than accepting the default settings.
Editor's note: This article was originally published in March 2019 and has been updated for comprehensiveness.
from Marketing https://blog.hubspot.com/marketing/google-calendar-tips
Some things you think will be simple actually end up getting really complex. Google knows this all too well, which is why Google Calendar has plenty of nifty features to simplify scheduling.
Your Google Calendar comes with your personal Gmail address, and you won't believe how simple it is to use and set up. However, when working at a company with a corporate Google account you suddenly have to find out how best to integrate your personal calendar with your weekly meeting schedule.
Below are some of our favorite tips, tricks, and features available in Google Calendar.
Skip to:
21 Google Calendar Features That'll Make You More Productive
1. Create new calendars for different parts of your life.
When you first start out on Google Calendar, you're given one calendar to start with — it's the one with your name under "My calendars," as shown in the screenshot below.
So, if you want to use your calendar for multiple purposes — like managing your actual schedule, planning periods of focused work time, and scheduling repeating reminders — you only have one place to do it. But when you're only working with one calendar, all of those things get treated equally — meaning you can't quickly and easily pull up the non-repetitive, important tasks you have for the day.
To combat this, just create a new calendar for each part of your life you'd like to keep track of on your Google Calendar.
How to Use This Feature
To create a new calendar, click the little plus sign (+) next to "My calendars," and you'll see the option, "New calendar." Select this option, name your new calendar, give it a description and time zone, and voilà — you've got yourself another calendar.

Pro Tip: You can even color-code each calendar to make it easy for you to pick out what you've got to do each day.
2. Schedule meetings with groups using "Find a time" or "Suggested times."
Do you ever need to arrange a meeting with several people who have busy schedules? It can be really annoying to try to figure out when you're all free. Thankfully, Google Calendar actually has two features that can do the heavy lifting for you: "Suggested times" or "Find a time."
How to Use This Feature
To use either of these two options, first make sure you've added everyone to the event who needs to attend. Then, if you'd like Google to suggest a time for you to meet, simply select the "Suggested times" link below your guests' names. A dropdown window will appear with a list of times when every meeting guest, including you, is available with no conflicts.

"Find a time" is the other way to quickly find a time that works for every guest included on the meeting invitation. To use this feature, choose the tab next to "Event details" called "Find a time," and you'll see everyone's schedules side-by-side for the day of your intended meeting. When you see a time when none of your guests have conflicts, click this line of the calendar to highlight the time and press "Save" at the top of your Calendar.

Pro tip: you can also use a free product like HubSpot Meetings to easily schedule meetings without back-and-forth emails. With HubSpot's Meetings tool, you can send a generic link and ask customers or prospects to choose a time on your calendar that works for them, or choose the sales rep who has the soonest availability.
3. Sync meetings with your CRM.
Use a CRM daily? It can be annoying to back and forth between your Google Calendar and your CRM. Instead, dive into your CRM settings to see if there's an existing integration with Google Calendar.
HubSpot CRM users, you're in luck — it's quick and easy to set up this integration. Learn how to do this here.
4. Sync your calendar with your marketing software.
If you want to make your Google Calendar align even more with your marketing activities, you can integrate it with your marketing software.
For HubSpot customers, you can use Zapier to set up some pretty nifty workflows, such as creating a social media message every time an event starts. Check out this page for more on how you can set up that integration, as well as some ideas for ways you can integrate the two.
5. Hide your event details.
Sometimes, the meetings you host or attend are sensitive in nature. Keep in mind, however, that a closed door isn't the only way for others to know what's going on inside. The event's details in Google Calendar can also reveal more to the rest of the office than you'd like.
To ensure you have as much privacy as you need during more sensitive meetings, set your event to "Private." This makes it so nobody viewing your weekly schedule sees the details of the event — meeting name, attendees, attachments, and so forth. By default, the public label on the event block will simply be, "Busy."
How to Use This Feature
To privatize the details of certain events on your calendar, click the event from your calendar view and select the pencil icon to edit the event's details. In the window that appears, find the briefcase icon just above the event description field.
With the first field set to "Busy," click into the second field and select "Private" from the dropdown, as shown below. Hit the blue "Save" button at the top of your screen and you'll be all set.

6. Add a Google Meet to your event.
Need to easily set up a face-to-face remote meeting? Just click the link to "Add Google Meet," and Google will set up a video call for your event attendees to use. (Learn more about Google Meet here)

7. Add attachments.
I don't know about you, but I often find myself attending meetings that require me to reference a relevant document. Maybe we're all working off one Google Doc, or perhaps we're pouring over an intricate spreadsheet.
Regardless, it's best to make sure all meeting attendees have the materials they need before the meeting begins so they don't have to go hunting in their inboxes for it. Google Calendar can help you do this, allowing you to attach documents directly to the event for guests to open and review.
How to Use This Feature
To attach a document to your event, click on your event block from the calendar view and select the pencil icon to edit the event, as shown below.

Once you're in the event's edit screen, look for a paper clip icon right above the description section, as shown in the screenshot below. Click this icon and a large window will appear where you can upload files to attach directly from your Google Drive.

Pro tip: When you reach the upload window, you can toggle to the "My Drive" tab to attach Google Docs, Sheets, and Slides that already exist in your Google Drive. Or, you can click the "Upload" tab on the far left of the window to attach offline files from your computer.
8. Enable your world clock.
Do you work with teammates who live around the world? You might find it's difficult to figure out what time is appropriate to schedule meetings with them. Fortunately, you can — by enabling "World Clock" in your Google Calendar settings.
How to Use This Feature
To quickly check multiple time zones when arranging meetings, click the gear icon on the top-righthand corner of your calendar view. These are your settings. Then, navigate to the "World clock" section, check the first blue box, and select the time zones you want to see from your calendar view.

Once you've chosen the time zones you want, return to your calendar view and you'll see the following on your Google Calendar's lefthand sidebar:

9. Enable working hours.
Not everyone is a 9-to-5 worker, but they might work quite a bit with those who are. If you have an unconventional work schedule that none of your colleagues seem to remember, this feature is for you.
"Working Hours" is a setting that alerts people if they try to add you to a meeting that lies outside a range of hours set by you in Google Calendar. Hey, it beats having to hit "Decline" and then follow up with the meeting organizer to remind them you're unavailable during that time.
A Google Calendar tipthat John Hall, Co-founder of Calendar, advises people to use is speedy meetings. "Beneath the default meetings duration settings is the option to create Speedy Meetings. Check the box and 30-minute meetings will automatically be scheduled to last 25 minutes while longer meetings will be cut by ten minutes. That way your working hours become more productive since you end meetings sooner and have time to catch up on todos that don't keep you beyond working hours."
How to Use This Feature
To enable specific working hours on your Google Calendar, click the gear icon from your calendar view to access your settings. Navigate to the "Working Hours" section, as shown below. Here, you'll be able to specify when you're in and out of work each day of the week.

10. Email event guests.
Remember the time you tried to email a large group of people about an event? Maybe you were trying to coordinate a team outing — or just let everyone know they should bring their laptops to the all-hands meeting. Regardless, I'll bet it was annoying to figure out who was actually going to the event and ensure you didn't forget anyone.
Well, this Google Calendar feature will come in handy next time.
How to Use This Feature
As long as you've added everyone to the event that needs to go, you can easily email everyone in the group by clicking on the event block from your calendar view and clicking the envelope icon.

Once you click on the envelope icon inside the event block, an email compose box will appear. Simply type in your message, type in the email addresses of the people you want to receive it, and hit send.

11. Add specific meeting locations.
I wish I'd known about this feature the last time I got coffee with someone in downtown Boston. We agreed to meet at Starbucks ... but thanks to the multitude of Starbucks locations in Boston, our conversation went something like this:
"Okay, so let's meet at the one on State Street," I said.
"Oh, the one by the Court House?" he asked.
"Well, it's kinda by the Court House, but further down State Street," I replied.
"Oh, you mean the one by Downtown Crossing?" he clarified.
How to Use This Feature
The logistics of a meeting can get fuzzy without a specific address or conference room. Thankfully, Google Calendar has a feature that'll fix all that. Instead of having the back-and-forth, I could've just sent my friend a calendar invitation with the specific address in the "Where" box. It integrates with Google Maps so it's super easy to figure out where you're meeting and how to get there.

12. Use desktop notifications.
As you probably can tell by now, I love Google Calendar ... but there is one feature of which I am not a fan.
If you have your Google Calendar open as a tab in your browser when it's 10 minutes before your next event, the 10-minute warning interrupts everything you're doing and takes over your screen. Forget about what you were working on -- Google Calendar will suddenly surface its tab with a big pop-up alert coupled with an annoying sound. It's the worst.
Luckily, there's a setting in Google Calendar that you can use to make notifications much less annoying: "Desktop notifications." Rather than interrupting your work, you'll see a much gentler box slide in from the top-righthand corner of your computer screen, displaying the name of the event that's 10 minutes away.
How to Use This Feature
To enable "Desktop notifications" in Google Calendar, click into your settings using the gear icon on the top-righthand corner in your calendar view. Scroll down to "Event settings" and click the "Notifications" box, as shown below.

By default, your notifications might be set as "Alerts," causing each event's 10-minute warning to hijack your computer screen. Instead, select "Desktop notifications," return to your calendar view, and you will have successfully enabled gentler meeting notifications.
13. Change the event notification time.
In the previous tip, you learned how to soften the notifications you receive in advance of a meeting. But did you also know you can change the number of minutes before the event you want to be notified?
How to Use This Feature
By default, Google will notify you 10 minutes before the event's start time. To change this warning time for a particular event, click on the event from your calendar view, and select the pencil icon to edit the event's settings.
In the event details, find the bell icon just below the video conferencing line. Hover your cursor over the box listed "10" and toggle up and down using the small arrow keys that appear to the right to change the number of minutes in advance you want to be notified. As you can see below, you can tell Google to notify you hours, days, or weeks in advance, too.

Pro tip: To the left of the "10," you can change "Notification" to "Email" if you'd rather be told about upcoming meetings via email instead of a desktop notification.
14. Arrange appointment schedules.
Ever thought about incorporating "office hours" so other folks in your company can book time with you? Maybe you're a part-time consultant with limited hours to book meetings, or want to limit the times your team can book time with you to certain times of day.
If any of the above scenarios resonate with you, think about using Google's Appointment schedules.
Google's Appointment schedules allow you carve out specific times of day on your calendar and then share these times with select people via a private calendar link. When these people click the link, they can schedule meetings with you at any of the times you carved out for them.
If your link recipients find a time they like, all they have to do is select it to book a private event with you, including all the information they'd need for the meeting.
How to Use This Feature
To set up your own Appointment slots, start by clicking anywhere in your calendar view to create an event. When the event options appear, click "Appointment schedules," as shown below at the very top of the window. Set the date range of the slots you'd like to open up for appointments, as well as how long each appointment should be by default next to "Slots with duration."

If you'd like more control over your Appointments, click "More Options," and you'll be taken to the window shown below. Click "This calendar's appointment page" for the link you can then share with those whom you're willing to arrange appointments.
15. Browse calendars of interest.
Want to make sure you're keeping track of holidays in other countries, your favorite sports team's schedule, or just the time the sun rises and sets each day? You'll find these calendars (and more) on your Google Calendar's lefthand sidebar.
How to Use This Feature
To browse and add interesting calendars, click the plus sign (+) next to "Add a coworker's calendar." Then, choose "Browse calendars of interest." From there, choose the calendars you'd like to subscribe to.
.webp?width=450&height=223&name=calendartips_26%20(1).webp)
16. Implement a custom view.
When you first set up your calendar, you'll have the option to view it as a week, month, the next 4 days, or as an agenda. That "4 days" option? You can switch that out with a different interval in your "Custom view" options.
How to Use This Feature
To adjust the number of days you see in your calendar view, click into your settings using the gear icon on the top-righthand corner of your screen. Scroll down to "View options." Click "Set custom view" and select how many days you want to see at one time from your calendar view, as shown below.

You can also make quicker, more general adjustments to your user interface right from your calendar view. Next to your settings' gear icon, you'll see a box that, by default, might say "Week." Click it to reveal a dropdown menu where you can customize your view further, as shown below.

17. Share your calendars with others.
If you're using Google Apps for your company, you can also control who sees your calendar, what they see, and whether they have permissions to edit it. (If you have an assistant, this tip will be very important to remember.) You can also make your calendar public, if you wish.
How to Use This Feature
To change your sharing settings, click on the plus sign (+) next to the preferred calendar and choose "Settings and sharing," as shown below.

Then, you'll be taken to the page shown below. Here, you can choose to do any of the following:
- Make the calendar public.
- Choose to show event details to everyone in your company, or just free/busy information.
- Add someone to your calendar and choose their individual permissions (see all details, make changes to events, hide all details, etc).

When you're done, click the back arrow on the top-lefthand corner of your screen to return to your calendar view. Google will automatically save your new calendar settings.
18. Use keyboard shortcuts.
Are you looking to really streamline your Google Calendar efforts? Google Calendar's got a ton of keyboard shortcuts to use, such as:
- t = Move your calendar view to today
- c = Create an event
- q = Quick Add an event
19. Use quick shortcuts to find a time or jump back to your current time.
Rather than manually scrolling through each month to find a time far in the future, you can type the letter "G" when you're on your Google Calendar to quickly find a date in the future.

Alternatively, if you've scrolled toofar and want to find your way back to the current time with manually scrolling, type the letter "T" to return to the current date/time.
20. Email all invited guests.
I'll admit — I've been guilty of creating events and then missing a recipient or two when I've attempted to email the entire group a friendly reminder, or necessary information to peruse prior to the meeting.
Fortunately, with Google Calendar you don't have to manually type-in every name on the invite. Instead, go to the top of your event and click the Email icon, which enables you to email all your guests from within the calendar itself:

21. Set a "Default Duration" to make shorter meetings, or a "Default Time" to eliminate weekends from your Calendar overview.
If you're feeling overwhelmed by the 30-minute or hour-long meetings that consistently deprive you of your ability to get other work accomplished, consider setting a "Default Duration" of 15 or 20-minutes for meetings so that, when you're planning quick check-ins on auto-pilot, you'll ensure you've planned your time efficiently.
Of course, for certain meeting topics, 30-minutes to an hour is necessary. But if the majority of your meetings are "catch ups" or brief 1:1's with colleagues, consider whether you can communicate the major points in 20 minutes or less, and save the more minor details for a follow-up email.

Alternatively, if you're like me, you only use your Google Calendar for the workweek — why, then, do you need the added space of Saturday and Sunday?
A while ago, I clicked the "Week" toggle at the top of my calendar and de-selected "Show weekends" to ensure I felt I could visualize exactly how my workweek was going to look — and saved my weekends for relaxation and more casual plans I could save in my phone if necessary.

Streamline Your Schedule
Google Calendar can start to feel a lot less simple the more events you have on your agenda. Luckily, these hacks and under-the-radar features make your life in Google Calendar much easier to organize.
Ideally, you'll use one (or a few) of these features to ensure you're using Google Calendar to youruniquebenefit and to fit your own lifestyle and work preferences, rather than accepting the default settings.
Editor's note: This article was originally published in March 2019 and has been updated for comprehensiveness.

No hay comentarios:
Publicar un comentario